Our Systematic™ Press Selection Tool is a step by step tutorial on how to get the most out of our Press-In-A-Box™ approach to press building.
Step 1: Select the right Cylinder for the Job:
The first and most important part of the system is the Multicyl cylinder, as it is the power source for the system. The two major considerations during cylinder selection are tonnage and stroke. Tonnage is important as your Multicyl system will need enough force to do the job, and stroke is important as the Multicyl must have enough travel to both do the work and allow for parts loading. Note that the Multicyl’s stroke consists of both an advance stroke and a power stroke – click here for a detailed description of how a Multicyl works.
Use our tonnage calculator to determine your force requirements:
Example:
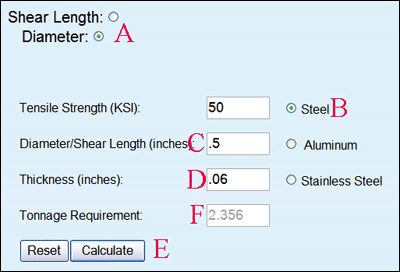
If you need to punch a ½” diameter hole in 16ga mild steel, and want to figure out how much tonnage it requires so you can select your Multicyl:
- Select the “Diameter” option as you are punching a round hole (A).
- Select the steel option (B) and the 50KSI is automatically filled in.
- Enter the hole size (C) and material thickness (D) information and then hit the calculate button (E).
- The tonnage requirement for your ½” hole appears (F).

NOTE: All compatible Multicyls are listed in the “Recommended Cylinders” list below. Please remember that stroke considerations are important as well, and you can research the recommended cylinders for stroke and additional information on our product page. For hole punching in sheet metal we typically recommend the MC 15-5-9 or XL 25-5-9 models. If you have any questions about your application or our products please contact us any time.
Step 2: Select the Right Cage for the Job
The cage is the frame or structural component for the Multicyl system. The Multicyl threads into the top of the cage and the base houses the tooling. We offer a wide selection of standard C-frame or Multicage (H-frame) style cages. The important things to consider when selecting a cage for your system are open height, throat depth, and footprint – the cage has to allow enough room to house the tooling, the part, and the Multicyl. Specs, pictures, and drawings for all our standard cages are available on our Products page.
Step 3: Select the Right Air Control Package for the Job
The air controls are used to operate the Multicyl system. We offer standard air control packages that come in foot pedal or two hand anti-tie down options. The application details (material handling, part size, etc) will often dictate what type of package you need, however you should keep in mind safety considerations. Multicyl’s patented self adjusting stroke (click here for details on this) often allows for elimination of pinch points at the point of operation. However, in some applications this is not practical (typically for issues of part loading), in such cases we recommend our two hand anti-tie down package for operator safety. Details on our air control packages are available on our Controls page.
Step 4: Select the Right Tooling for the Job
You may already have the tooling for your job. If so you have probably used the requirements of the tooling to help select the other components of the system. On the other hand, you may be looking to Multicyl for your tooling. Multicyl offers a wide range of standard tooling for many applications and we can design and supply custom tooling as well for your turn-key Press-In-A-Box™ system. Review our Applications page to see many examples of tooling that we can supply with our systems. If you are using your own tooling with your Multicyl system, we recommend that you send us the details to help you review the application.
